Hello Guys,
Here I am sharing the installation and configuration of SUN ZFS Storage Appliance simulator on Virtual Box. You can see the snapshot for better understanding.
| Host OS | Fedora 18 |
| Guest OS | Sun ZFS Storage 7000 |
| Virtual Box Version | 4.2.12 r84980 |
Download
- Oracle Virtual Box.(Download for rpm version, as our Host OS is Linux) => For virtualization and it provides the platform to run ZFS storage appliance
- Sun ZFS 7000 image. => The Actual Storage Appliance.
About the product :
- This is a storage simulator. One can understand how to create Storage Pools, profile selection, Snapshots, Clones and Scheduled backup. We can also configure various protocol like iSCSI, SMB, NFS etc.,
- We can understand about worksheet, which gives graphical information about CPU loads, I/O Bytes per Second, I/O Bytes per Second Based on operation, NFSv4 broken down by type of operations, CPU utilization, etc.,
- We can do health checks for the Hard disk. This simulator will be good for understanding the 7120, 7320 and 7420 series of Oracle Storage. ZFS is Zettabyte File System designed and implemented by Sun Microsystem.
This product gives the basic idea of storage and the background backup. This is will come with BUI(Browser User Interface) and CUI (Command User Interface)
1. The first step is Installation of rpm. You can download from the oracle website, with respect to your Host OS(Fedora 18). Hence, I downloaded the rpm VirtualBox-4.2-4.2.12_84980_fedora18-1.i686.rpm.
Then issue the following command under root user as specified in snapshot.

2. Our Next step is importing Appliance. Open Virtual Box. Then go to tab File >> Import Appliance (or) simply ctrl + I

3. Extract the image which you downloaded for oracle site.(Which mentioned on Download section)

4. Browse and give input as .ovf file.

5. Click and Proceed “Import”

And in below you can see the status of the importing.

Once import is successful. You can see the Machine on the left panel.
6. Few more verification. Click on ‘settings‘ or ctrl+s. Click on the network and verify Adapter1 and Adapter2 are configured. And select Host-only Adapter for ‘Adapter1‘. where as ‘ vboxnet0 ‘ is the virtual network.


7. Start the Machine Now.

8. Now we have to configure Network details. All ‘*’ refers Mandatory means, you cannot leave empty.

Here is the filled details.

We have completed installation and configuration.
In the below snapshot I encircled network in red colour. Just put the cursor on that it will give the network details and make sure it display “cable is connected”.

Then on your Favourite browser(I used Chrome) hit the url http://192.168.56.101:215 on the Host OS (for me its Feodra18 ) and Click on proceed anyway to go further.

Here is our login page of our oracle ZFS on BUI.
If you have any poblem go through our Notes.

Note :1
By default virtual network will be created. If not we have to do it manually. you can verify this by giving ifconfig -a on the host OS terminal(on Fedora 18). you can see the entries as ‘vboxnet0’
If not go to Virtual Box, File >> Preferences >> Network. If there is no entries, make the entries by clicking the adapter plus sign (encircled in red color)
Then verify with ifconfig -a, if not restart the network services and check it.

Note : 2
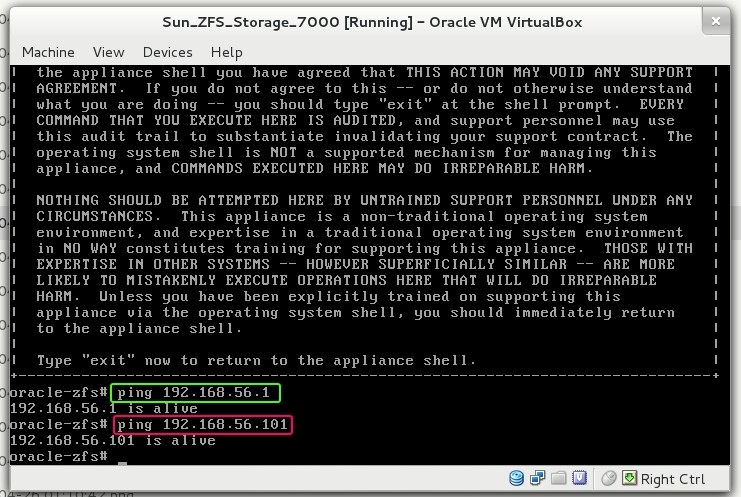
Make sure you able to ping the virtual IP from the appliance. This can be achieved by the following way login to appliance by giving username/password on CUI. Then type ‘shell’ and give ‘Y’. Now you are connected to OS terminal(Guest OS) and you can use ping. And ping in reverse way too.

- Green encircled : Virtual IP.
- Red Encircled : Appliance IP.
Note: 3
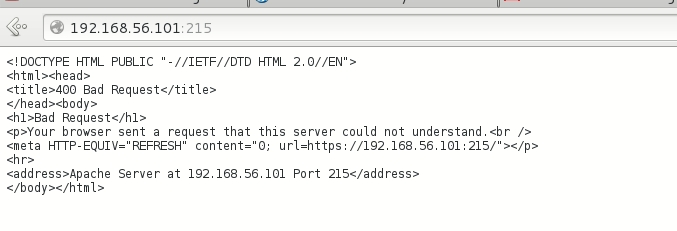
For some browser, BUI will not work due to browser compatible problem as attached the following snapshot. Check ZFS compatible Browser and then try.

Hope This will help you.
Send Us your valuable feedback, Help us to serve better.