Managing images in a given web page design is always a daunting task for web designers, placing multiple images on a single page without occupying more space requires a lot of plan and image galleries and sliders provide an easy solution for such scenarios. Though there are advanced jQuery plugins for image galleries and sliders, this article deals with the basics of creating image sliders.
 |
 |
Basic working mechanism of an Image Slider.
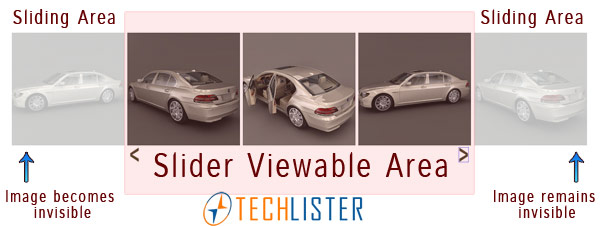
From the above visual representation, you can see that at any given time a set of images are displayed and the remaining images are hidden. The hidden images can be displayed using the navigation that slides the images to left or right. So all we have to do is to determine the following while creating an image slider.
- Total number of images.
- Number of images to be shown.
- Number of images to slide to the left or right.
So based on the above considerations we need to calculate the display area in pixels which is usually the number of images to be shown multiplied by the width(pixels) of the image. Lets say that we have 10 images and if we like to show only 3 images at a time, then the display area would be 3 multiplied by width of an image.
Ok, now lets delve in to the code..
HTML for Image Slider
<ul id="gallery">
	<li><a href="#"><img src="images/7s2.jpg" alt="" /></a></li>
	<li><a href="#"><img src="images/7s3.jpg" alt="" /></a></li>
	<li><a href="#"><img src="images/7s4.jpg" alt="" /></a></li>
	<li><a href="#"><img src="images/7s5.jpg" alt="" /></a></li>
	<li><a href="#"><img src="images/7s6.jpg" alt="" /></a></li>
	<li><a href="#"><img src="images/7s7.jpg" alt="" /></a></li>
</ul>
So we have set of images which we have arranged them as HTML list elements. You can have your images named and arranged as you like. Now lets look int the CSS for our image slider.
CSS Code for Image slider
#gallery-wrap
{
	margin: 0 auto;
	overflow: hidden;
	width: 610px;
	position: relative;
}
#gallery LI
{
	float: left;
	margin: 5px 5px 0px 0;
	list-style-type: none;
}
#gallery LI A IMG
{
	height: 200px;
	width: 200px;
	border-style: none;
}
#gallery-controls
{
	margin: 0 auto;
	width: 600px;
}
#gallery-prev
{
	float: left;
}
#gallery-next
{
	float: right;
}
#gallery
{
	margin: 5px 0 0;
	padding: 0;
	border: 0;
	font-size: 100%;
	font: inherit 1em sans-serif;
	position: relative;
}
CSS code is pretty much a basic stuff, We have left aligned the list elements and we have created a wrapper for viewing area which is set to 610 pixels wide, with overflow property set to be hidden. So the images out of the visible area will remain hidden.
Now the jQuery part that handles the click events and slides the images accordingly.
jQuery for Image Slider.
$(document).ready( function() {

	// Gallery
	if( $("#gallery").length ) {

		// calculate the parameters
		var totalImages = $( "#gallery > li" ).length, //6
		imageWidth = $( "#gallery > li:first" ).outerWidth( true ), //205
		totalWidth = imageWidth * totalImages, //1230
		gallW = $("#gallery-wrap").width(), //610
		visibleImages = Math.round( $("#gallery-wrap").width() / imageWidth), //3
		visibleWidth = ( visibleImages * imageWidth ) , //615
		stopPosition = (visibleWidth - totalWidth); //-615

		$("#gallery").width( totalWidth );

		$( "#gallery-prev" ).click( function() {
			if( $( "#gallery" ).position().left < 0 && ! $( "#gallery" ).is( ":animated" )) {
				$( "#gallery" ).animate(
				{
					left : "+=" + imageWidth + "px"
				},
				{
					duration: 1500 , // how fast we are animating
					easing: 'easeOutBounce' // easing: 'swing' - default jquery // the type of easing
					//complete: function() { }  //the callback
				}
				);
			}
				return false;
		});

		$( "#gallery-next" ).click( function() {

			if( $("#gallery").position().left > stopPosition && ! $("#gallery").is(":animated")) {
				$("#gallery").animate(
				{
					left : "-=" + imageWidth + "px"
				},
				{
					duration: 1500 , // how fast we are animating
					easing: 'easeOutBounce' // easing: 'swing' - default jquery // the type of easing
					//complete: function() { } // the callback
				}
				);
			}
				return false;
		});
	}

});
jQuery code is almost self explanatory. We have calculated the slider size, start and stop position and two click events for left and right. Using .animate() we slide the images based on the click. We have also used easing jQuery plugin to add the bounce effect while sliding the images, which is optional.
Have fun.